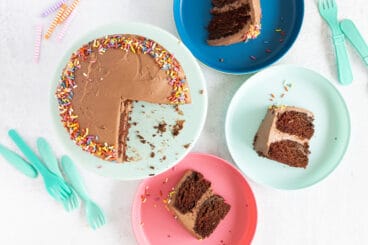
This most delicious Chocolate Peppermint Cake is filled with flavors of chocolate and mint and has a fluffy, tender texture. Plus, it’s lower in added sugar and has the easiest one-bowl method with zero electric tools needed!

After years of making my Healthy Chocolate Cake, my kids requested a peppermint version for the holidays, and honestly—this is SO good. Plus, it stirs up so easily, is easy to adjust for most allergens so more families can enjoy it, and you can make it ahead of time to fit your busy schedule.
It’s a great dessert for kids for Christmas or New Years, or for a birthday party or special event.
I love using Stonyfield plain Greek yogurt here since it is mild in flavor and has the perfect creamy consistency. Plus, Stonyfield yogurt is made with high-quality organic ingredients and has a flavorful yet not-too-tangy taste. The whole milk yogurt adds richness to the cake and helps to create a springy texture and tender crumb. So yum!
(You may also like my Greek Yogurt Cake, Healthy Chocolate Cake, Vegan Vanilla Cake, and Blueberry Yogurt Cake as more yummy options.)
Your toddler won’t eat? Help is here!
Sign up for our email updates to get tips and ideas sent to your inbox.
Table of Contents
Ingredients You Need
Here’s a look at the ingredients you need to make this Chocolate Peppermint Cake so you know what to pick up from the store or grab from the pantry.

- All-purpose flour: Using this type of flour ensures that the cake will be tender, fluffy, and have a nice crumb.
- Unsweetened cocoa powder: I like SACO or Hershey’s Special Dark unsweetened cocoa powder for the best chocolate flavor.
- Baking powder and baking soda: A combination of these two ensures that the cake bakes through in the middle, rises nicely, and also stays tender.
- Whole-milk plain Greek yogurt: Using Greek yogurt as the base of the cake adds protein and calcium, but it also makes a moist cake that is a joy to eat.
- Maple syrup: I prefer to use maple syrup (or honey for kids over age 1) in this recipe to even out the sweetness.
- Eggs: I use large eggs in my recipes, so be sure to use them here so that the volume of the batter is correct.
- Unsalted butter: I use unsalted butter in this recipe to add richness and so I can control the salt level on my own.
- Peppermint extract: The mint flavor in the cake comes from a splash of peppermint extract. Look for it near the vanilla extract in the baking aisle of your grocery store.
- Frosting and crushed candy canes: You can use store-bought vanilla frosting, Cream Cheese Frosting, Yogurt Frosting, or Chocolate Cream Cheese Frosting according to your preference. Crushed candy canes add the final touch.
Step-by-Step Instructions
Here’s a look the process involved in making this Chocolate Peppermint Cake recipe so you know what to expect from the process. Scroll down to the end of this post for the full recipe, including the amounts and timing.

Step 1. Stir the dry ingredients together in a medium bowl. Use a small fine-mesh sieve to remove any lumps from the cocoa powder.

Step 2. Add in the wet ingredients and gently but thoroughly stir to create a smooth batter.

Step 3. Add the batter to the prepared cake pans, using half of the batter in each one.

Step 4. Bake until a cake tester or toothpick inserted into the center comes out cleanly. Remove from pans to cool. Frost as desired.
Frequently Asked Questions
See the Notes at the end of the recipe for the specific information. There’s an easy option to swap them out.
You can omit them entirely or crush other peppermint candies. You can also add sprinkles if you prefer.
Yes, divide the batter amount a 12 cup standard size muffin pan lined with paper liners. Lightly spray the liners with nonstick spray. Use about ¼ cup batter in each and bake at 375 degrees F for 14-16 minutes.

How to Store
Once cooled, store cake in an airtight container for up to 3 days at room temperature. Store in the fridge in an airtight container for up to 5 days.
You can also freeze the cake, wrapped tightly in plastic wrap and put into a freezer bag with as much air removed as possible for up to 3 months. Thaw at room temperature.
Best Tips for Success
- Gluten-free: Substitute cup-for-cup gluten-free flour in place of the wheat flour.
- Egg-free: Omit the eggs. Reduce the yogurt to ¾ cup. Add ¼ cup additional milk. Proceed with the recipe.
- Add a handful of mini chocolate chips to the batter if desired.
- To make into cupcakes: Divide the batter among a 12-cup standard-size muffin pan lined with paper liners. Lightly spray the liners with nonstick spray. Use about ¼ cup batter in each and bake at 375 degrees F for 14-16 minutes.
Related Recipes
I’d love to hear your feedback on this recipe, so please comment below to share!

Chocolate Peppermint Cake
Ingredients
- 1½ cups all-purpose flour
- ¼ cup cocoa powder (sifted to remove lumps)
- 1 teaspoon baking powder
- ½ teaspoon baking soda
- ¼ teaspoon salt
- 1 cup whole-milk plain Greek yogurt
- ½ cup unsalted butter (melted and cooled, slightly)
- ⅓ cup maple syrup (or honey for kids over age 1)
- 2 eggs (large)
- ¼ cup milk
- 1 teaspoon peppermint extract
- 2 cups frosting (optional; see Notes below)
- ¼ cup crushed candy canes (optional but recommended)
Instructions
- Preheat the oven to 375 degrees F. Grease two 6-inch cake pans with nonstick spray and rounds of parchment paper.
- In a medium bowl, stir together the flour, cocoa powder, baking powder, baking soda, and salt.
- Add the yogurt, butter, maple syrup, eggs, milk, and peppermint extract.
- Gently stir or whisk together.
- Divide batter between the prepared pans, using half in each.
- Bake for 24-30 minutes, or until a cake tester inserted into the center comes out cleanly. Remove from oven, let cool in the pan for a few minutes, then invert cakes onto a wire rack to cool fully.
- Place one cooled cake onto a cake stand. Add ⅓ of the frosting and spread evenly. Add the second cake and the rest of the frosting. Decorate with crushed candy canes if desired.
Equipment
Notes
- Once cooled, store in an airtight container for up to 3 days at room temperature. Store in the fridge in an airtight container for up to 5 days.
- You can also freeze the cake, wrapped tightly in plastic wrap and put into a freezer bag with as much air removed as possible for up to 3 months. Thaw at room temperature.
- Gluten-free: Substitute cup-for-cup gluten-free flour in place of the wheat flours.
- Egg-free: Omit the eggs. Reduce the yogurt to ¾ cup. Add ¼ cup additional milk. Proceed with the recipe.
- Add a handful of mini chocolate chips to the batter if desired.
- To make into cupcakes: Divide the batter among a 12-cup standard-size muffin pan lined with paper liners. Lightly spray the liners with nonstick spray. Use about ¼ cup batter in each and bake at 375 degrees F for 14-16 minutes. Frost as desired.
- You can use store-bought vanilla frosting, Cream Cheese Frosting, Yogurt Frosting, or Chocolate Cream Cheese Frosting according to your preference. Crushed candy canes add the final touch.







Absolutely love this! I used your recipe, put it in a 9.5 inch cake pan. Topped with the crushed candy cane (Chef’s kiss!). Kids liked it. Adults liked it. Mom loved it! Perfect for the peppermint lover in your life. 11/10.
Hi! This recipe sounds delicious. Can you use it to make cake cookies? instead of in the form of a cake? Thanks!
I haven’t tried it that way so I can’t say for sure, but if the batter consistency seems similar to ones you’ve made before give it a shot!
Hi could I use 1 larger cake pan instead of 2 6 inch cake pans?
I think you could use a 9×13-inch pan and bake for a similar time, though check it starting at 20 minutes in the middle with a cake tester.
Hi Amy! What frosting did you use in the pictures? It looks so yummy
Thank you! Love all your recipes
It’s in the ingredients image in the middle of the post–the Miss Jones brand of vanilla frosting. From what I can tell, it’s in most grocery stores and it’s very good!
Does the recipe call for muffin tin and not cake pan?
You can make this as a cake or as cupcakes. The recipe is for a cake but in the notes there is information on how to make them into cupcakes, if you prefer.