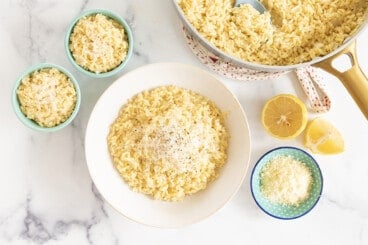
With a simple oven-baked method and lots of fresh flavors, this Baked Risotto is an easy option for family dinner. Plus: The method is so simple, and you get to skip standing and stirring endlessly at the stovetop!

The traditional way to make risotto involves standing by the stove and stirring warm broth into the pot with rice. I love traditional risotto, but I find it to be nearly impossible to make with toddlers and kids underfoot—which is why baking it in the oven is such a nice option!
This version has just a handful of ingredients, too, and can be finished with a squeeze of fresh lemon for a nice fresh flavor.
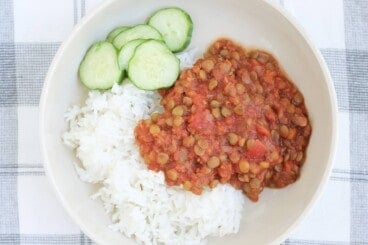
I love this as a vegetarian meal for kids, as a side dish with proteins such as Fish Nuggets or Marinated Chicken Tenders, or even as a hot lunch idea.
(You may also like Broccoli Rice, Cheesy Rice, and Veggie Nuggets.)
Table of Contents
Your toddler won’t eat? Help is here!
Sign up for our email updates to get tips and ideas sent to your inbox.
Ingredients You Need
To make this Baked Risotto recipe, you’ll need to have the following ingredients on hand and ready to go.

- Arborio rice: This is the classic short grain rice style that is used in risotto, so we use it here. It actually cooks fairly quickly using the oven-baked method.
- Chicken broth or vegetable broth: You can use either of these according to your preference. I usually reach for reduced sodium broth or stock if buying from the store.
- Onion: You can use white onion or yellow onion to add flavor to this baked risotto.
- Zucchini: I like to add a small zucchini to this dish for an extra veggie though you can skip it if you prefer.
- Frozen peas: Frozen petite peas are the type that I prefer since they have less starch and more sweetness than regular larger peas.
- Olive oil and butter: We use a combination of both for flavor and to grease the pan.
- Parmesan cheese, lemon, fresh herbs to top as desired.
Step-by-Step Instructions
Here’s a look at the process involved in making this Easy Baked Risotto so you know what to expect. Scroll down to the end of the post for the full information.

Step 1. Wash and dice the zucchini. Grate the onion so it blends right in.

Step 2. Add the rice and onion to a 2- or 3-quart baking dish or oven-safe frying pan.

Step 3. Add chicken broth. Cover with foil tightly and bake for 20 minutes.

Step 4. Stir in the zucchini, peas, Parmesan, butter, and salt until well combined. Cover and bake.
Frequently Asked Questions
I prefer to cover it to ensure that the rice has enough time and liquid to become soft before the liquid evaporates.
The grains should be soft yet al dente.
If the rice isn’t fully cooked through, simply add a little more broth or water and cook a little longer.

How to Store
You can store leftover Baked Risotto, once fully cooled, in an airtight container in the refrigerator. Warm through in the microwave to serve. (Add a little more broth or water if desired if the risotto is firm once it’s warmed up.)
Best Tips for Success
- Be sure to cover the rice during cooking.
- Use vegetable broth to make this vegetarian.
- When you remove the pan from the oven at the end of cooking, there may be a little liquid left. This is okay! It will continue to absorb the liquid a bit as it sits.
- Use a broth that you like the flavor of, and season to taste with salt if needed.
- You may also like my Butternut Squash Risotto.
Related Recipes

I’d love to hear what you think of this recipe if you make it, so please share below in the comments!

Favorite Baked Risotto
Ingredients
- 2 tablespoons olive oil
- 1 small onion (grated)
- 2 cups arborio rice
- 1 quart reduced sodium chicken broth
- 1 cup diced zucchini
- ½ cup reduced sodium chicken broth (or cream or water)
- ½ cup grated Parmesan cheese
- ½ cup frozen petite peas
- 1 tablespoon butter
- Salt, pepper, and/or fresh lemon juice to taste
Instructions
- Preheat the oven to 350 degrees F.
- Add the rice and stir to coat all of the grains.
- Add the quart of broth, raise heat to high, and bring to a boil.
- Transfer pan to oven, cover with an oven-safe lid or foil, and bake for 20 minutes.
- Remove from the oven, remove the lid, and stir in the zucchini, peas, additional broth, Parmesan, and butter, until combined and creamy. Serve warm topped with additional Parmesan cheese, lemon, and fresh herbs as desired.
Equipment
Notes
-
- You can store leftover Baked Risotto, once fully cooled, in an airtight container in the refrigerator. Warm through in the microwave to serve. (Add a little more broth or water if desired if the risotto is firm once it’s warmed up.)
- Be sure to cover the rice during cooking.
-
- Use vegetable broth to make this vegetarian.
-
- When you remove the pan from the oven at the end of cooking, there may be a little liquid left. This is okay! It will continue to absorb the liquid a bit as it sits.
-
- Use a broth that you like the flavor of, and season to taste with salt if needed.
Nutrition
This post was first published October 2018.


Hi! LOOOOVE your recipes. If I want to use a bag of store-bought pre-frozen kale, should it be 1/4 cup like you advise for spinach? Thank you!
Does this freeze well? Thinking about batch cooking for freezer meals.
Yes, you could freeze it. You might need to add a bit of broth to it when reheating as the risotto might firm up.
Can you freeze it ?
Sure
My kid is somewhat picky and loved this! Great recipe!! I put a baking tray on top to cover it better. I also added some more frozen chopped veggies and some pumpkin. Thanks for posting I will definitely be revisiting this recipe.
We love this rice! I love the hands-off nature of the recipe. I have made it several times now.
The flavor of this rice was great but there’s no way this will cook in the oven! After an hour, i had to transfer it to a pot and cook stovetop, wasting so much time and gas! I used regular brown rice. Maybe you are using instant rice?
I’m sorry to hear that! I make this with long grain brown rice.
Hi! Hmmm, I’m honestly not sure. I just made it twice last week with these instructions and it cooked the rice through. Did you cover the rice for the first half of the cooking process? It’s possible that some brands may cook more quickly than others but it seems odd that there would be an issue. I’m really sorry for the difficulty!
Hi, did you recently change the recipe to 2 cups of rice? I printed the recipe around the end of April, 2018 and my directions say 3 cups of rice and 8 cups of chicken broth. Am I missing something?
I apologize for not making a note. I did retest the recipe and made a few adjustments including decreasing the volume of both rice and broth since it made so much and many people were having a hard time getting the rice cooked totally through.
I usually do risottos on the stove top, just because its so much faster… I use basmarti rice, but am keen to use brown basmarti… I love the one-potness of this dish. I would also substitute a bit of the butter for cream, and ad coriander and a bay leaf or two. I think sun dried tomatos could be a fun addition also. And left over roast chicken or ham or vego sausages. I bet my kids would eat this!
I love all those ideas—and I like doing stovetop too but I sometimes have a hard time staying nearby for all of the stirring!
Do you have a convection oven by chance? I used the long grain Lundberg rice that you recommended and still required double the cooking time like the commenter above. It is still cooking, but smells delicious! Excited to try it.
I don’t—so odd! I will try it again soon and see if I need to update the timing. I hope you enjoy it!
This recipe did not work for me! After an hour and 15 minutes in the oven it still was not even close to absorbing the stock and the rice was still rock hard! I ended up switching it to the stove top and adding a ton more broth, and about 30-40 minutes later the rice was FINALLY cooked. Not worth the hassle at all!!
The type of rice makes a big difference and I’m so sorry to hear that you had trouble.
Thank you so much for responding! I’m sorry, I’m still confused though. Step 2 doesn’t say anything about cooking them, just add them in. Do you put them in fully cooked?
The zucchini softens because the pieces are so small and the peas thaw. You add them to really hot rice and then cover it, so they will be cooked through when it’s time to serve!
How would you make this to freeze?And when do the veggies cook?
I would make it according to the recipe, let it cool fully, then freeze portions you want in zip top freezer bags. Remove as much air as you can before sealing, press them flat, and freeze for up to 3 months. The veggies cook with the rice mixture.
I meant to say that you add the veggies in step 2:)
Is this 3 cups of cooked rice or uncooked? Thanks!
Uncooked!