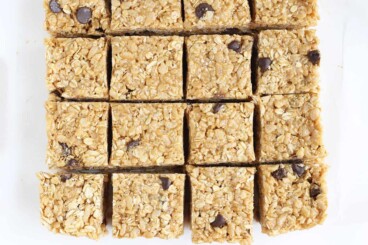
With an easy method, accessible pantry ingredients, and the yummiest flavor, these Peanut Butter Granola Bars are a snack time staple. Plus: They store well for weeks for snacks or as an easy meal component.

I’ve had a few requests for a version of my Chocolate Chip Granola Bars with a smidge more protein, and since peanut butter granola bars are a favorite among many, this is a perfect option. With easy-to-find ingredients, a super simple method, and seriously yummy flavor, this healthy snack to make is filling and nutritious.
You also don’t need to worry about the bars losing their shape at room temperature since they hold up so well. Which means they can be a great after-school snack or preschool snack. And you can also serve them as part of a healthy breakfast for kids, a toddler lunch idea, or a lunchbox idea for kids in elementary school.
(You may also like Homemade Granola Bars, Strawberry Oatmeal Bars, Fig Bars, and Banana Oatmeal Bars.)
Table of Contents
Your toddler won’t eat? Help is here!
Sign up for our email updates to get tips and ideas sent to your inbox.
Ingredients You Need
Here’s a look at the ingredients you need to have on hand to make Peanut Butter Granola Bars so you know what to pick up from the store or have ready.

- Rolled oats: I use regular rolled oats in this recipe. They are sometimes called “old-fashioned oats.” You can also use gluten-free rolled oats if needed to make this granola bar recipe gluten-free.
- Flour: A little flour helps the batter hold together nicely, and it helps the bars be soft and easy to chew.
- Brown sugar: I add brown sugar to aid in the texture and sweetness.
- Chia seeds: Chia seeds add nutrition to the batter and help it bind together (without eggs).
- Banana: A ripe banana adds to the natural sweetness of the bars, but it doesn’t make them taste overtly banana, promise!
- Peanut butter: I use creamy unsweetened peanut butter in this recipe. It easily stirs in with the rest of the ingredients and has pure peanut flavor.
- Honey: Honey adds sweetness and also contributes to the batter baking up and holding the bar shape easily.
- Mini chocolate chips: I prefer to use mini chocolate chips here to make the chocolate chip granola bars resemble store bought bars. You can use full size chocolate chips, though you may want to chop them up.
Step-by-Step Instructions
Here’s a preview of how to make these Peanut Butter Granola Bars so you know what to expect from the process. Scroll down to the end of this post for the full information, including the amounts and the timing.

Step 1. Mash the banana.

Step 2. Add the peanut butter, honey, and vanilla to the banana.

Step 3. Add the oats, flour, brown sugar, salt, and chia seeds to a medium bowl. Stir into the wet ingredients. Mix.

Step 4. Press the mixture into the prepared pan and bake.
TIP: Pressing the batter down very firmly into the pan, and letting the bars cool fully in the pan, helps ensure that the bars hold together well.

Frequently Asked Questions
In this recipe, the banana, peanut butter, and oats help the bars hold together. Press the batter down firmly in the pan, too.
It can depend on the brands of bars and ingredients you buy, but generally speaking, it can be much more affordable to make granola bars at home since store bought bars for kids can average at more than $1 per bar.
You can store these bars in the refrigerator or in the freezer, so you can have a stash to pull from for months.

How to Store
Store granola bars in an airtight container or storage bag for up to 2 weeks. I prefer to store them in the fridge.
You can wrap each bar in plastic wrap if desired.
Best Tips for Success
- Use raisins in place of the chocolate chips.
- Use an all-purpose gluten-free flour blend in place of the whole wheat flour.
- Note about the sugar: I made this recipe over and over looking to get the right texture and flavor, and I tried using less sugar—they were too bland. If you want to lower the honey slightly to ⅓ cup, you are welcome to do that. The amounts in this recipe are the ones I settled on as leading to the best results.
- I use unsweetened creamy natural-style peanut butter in this recipe.
Related Recipes
I’d love to hear your feedback on this post, so please rate and comment below!

Peanut Butter Granola Bars
Ingredients
- 3½ cups rolled oats
- ¼ cup whole wheat flour
- ¼ cup brown sugar
- ½ teaspoon salt
- 2 tablespoons chia seeds
- ½ cup mashed banana (from 1 large very ripe banana)
- ½ cup peanut butter
- ½ cup honey
- 2 teaspoons vanilla extract
- ⅓ cup mini chocolate chips
Instructions
- Preheat the oven to 350 degrees F. Coat an 8×8-inch pan with nonstick spray and line with parchment paper. (The paper helps make the bars be easy to lift out and slice after baking, without scratching your pan.)
- Add the oats, flour, brown sugar, salt, and chia seeds to a medium bowl. Stir to mix.
- Add the mashed banana, peanut butter, honey, vanilla, and chocolate chips. Stir very well to evenly combine the wet and the dry ingredients.
- Press the mixture into the prepared pan and bake for 20 minutes.
- Cover pan with foil and bake for an additional 10 minutes. (The foil prevents the edges from over browning.)
- Remove pan from the oven and place on a wire rack to cool completely.
- Once cooled, use the paper to lift the bars out of the pan onto a cutting board. Slice into rectangles or squares.
Notes
- Store granola bars in an airtight container or storage bag for up to 2 weeks. I prefer to store them in the fridge.
- You can wrap each bar in plastic wrap if desired.
- Use raisins in place of the chocolate chips.
- Use an all-purpose gluten-free flour blend in place of the whole wheat flour.
- Note about the sugar: I made this recipe over and over looking to get the right texture and flavor, and I tried using less sugar—they were too bland. If you want to lower the honey slightly to ⅓ cup, you are welcome to do that. The amounts in this recipe are the ones I settled on as leading to the best results.
- I use unsweetened creamy natural-style peanut butter in this recipe.



What can you use for Brown sugar since my wife is diabetic. Honey is fine it is natural sugar.
Of those two, I would use honey. Enjoy!
My grandson LOVES these bars! “Yummy-Yums!”
He’s two years old, constantly on the go, and constantly wanting to eat. We sometimes laugh that we have to follow him around with a plate to keep some weight on him because he’s so busy! This is an ideal way for him to get much-needed, healthy calories.
They do keep very well, we follow the recipe or even add a pinch of salt & bit more honey to brighten up the flavor! So yummy!!!