Transform simple, affordable ingredients into Yogurt Pouches for snack or breakfast. This easy yogurt tube recipe can be made in about 5 minutes, then stored in the refrigerator or freezer.
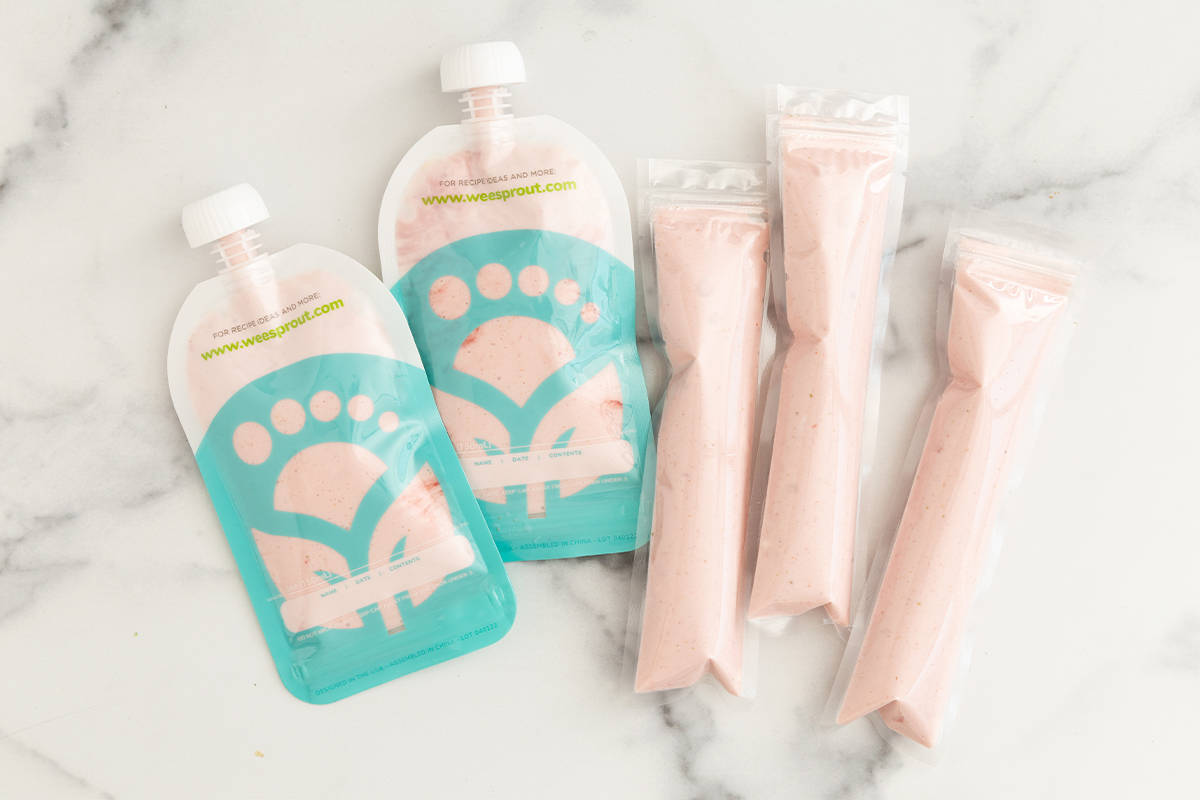
Yogurt Pouches and yogurt tubes are such an easy kids snack to have on hand. I often save a little money on store-bought pouches and make a batch myself. I love this recipe because it’s so easy to make with ingredients I usually have on hand and the resulting yogurt mixture is thick and yummy.
Our favorite flavor is strawberry, but I have a few variations at the end of the post too.
Know that you can make this recipe with reusable pouches or with disposable popsicle sleeves. And you can serve it at home or pack with an ice pack to send to daycare or as a snack for preschool or big kid school.
(You may also like Toddler Smoothies, Applesauce Pouches, Mango Popsicles, and Yogurt Drinks.)
Table of Contents
Your toddler won’t eat? Help is here!
Sign up for our email updates to get tips and ideas sent to your inbox.
Homemade Yogurt Tubes
It’s simple to make these as pouches or tubes. The only difference is that with the tubes, you may need a small funnel to make filling them easier. Then, you can serve the tubes from the refrigerator or you can freeze them and serve them as a popsicle.
Ingredients You Need
Here’s a look at the ingredients you need to have on hand to make this easy yogurt tube recipe.

- Strawberries: You can use fresh or thawed frozen berries, conventional or organic strawberries in this recipe.
- Plain whole-milk Greek yogurt: This type of dairy yogurt produces the creamiest results and is a good source of calcium, probiotics, and protein. If you only have regular yogurt on hand or prefer to use nondairy, you can use that here instead. Though the mixture may be a little thinner.
- Maple syrup: Adding a little sweetener is optional but recommended to balance the flavors. (If you prefer not to add it, taste the fruit and yogurt mixture to be sure it tastes good to you.)
Step-by-Step Instructions
Below is an overview of the process of making this yogurt pouch recipe so you know what to expect from the process. Scroll down to the end of the post for the full information, including the timing and amounts.

Step 1. Clean the berries and remove the stems. Add to a blender.

Step 2. Blend berries until smooth.

Step 3. Stir in the yogurt, maple syrup, and vanilla.

Step 4. Add to a pouch.
Frequently Asked Questions
Generally speaking, a baby can have a yogurt pouch after starting solids, which typically happens around 6 months of age.
Yogurt needs to be refrigerated or you can freeze it for longer term storage. If you want to take it out of the house, pack it in an insulated lunch bag with an ice pack.
Seal the container and refrigerate for 3-5 days.
How to Store
Store prepared yogurt pouches in the refrigerator for up to 5 days or in the freezer for up to 6 months. From the freezer, you can either serve them frozen as fruit ice pops or Strawberry Popsicles or let thaw to normal yogurt tube consistency.
Best Reusable Pouches
I prefer the Squeasy Gear Pouch since it’s the hardest for little kids to spill on purpose or by accident. I also like the WeeSprout pouches, which can be purchased as a set to prep pouches for the week, or the disposable tube sleeves, which can be used to make ice pops or yogurt tubes.
Best Tips for Success
- Use mango, banana, or blueberry in place of the strawberry to vary the flavor.
- Use a small funnel to help make filling the yogurt tubes easier.
- Sweeten to taste. The amount of maple syrup you need will depend on the sweetness of your fruit and the preferences of your family.
- Greek yogurt makes for the thickest texture that is most similar to store-bought pouches. You can use regular yogurt too, though it may be a little runnier. (Both thicken slightly as they sit in the fridge though.)
- Use dairy-free yogurt to make these nondairy. For best results, use a Greek-style one that is thicker.
- Try my other favorite snack ideas like Frozen Yogurt Bites, Pineapple Smoothie, Raspberry Smoothie, Sore Throat Popsicles, and Pumpkin Smoothie.
Related Recipes
I’d love to hear your feedback on this post, so please rate and comment below!

Yogurt Pouches (Yogurt Tubes)
Ingredients
- 2 cups strawberries (trimmed; fresh or thawed frozen)
- 2 cups plain whole-milk Greek yogurt (Greek preferred, but regular works too)
- 1-2 tablespoons maple syrup (optional but recommended)
Instructions
- Add the berries to a blender and blend very smooth.
- Stir in the yogurt and maple syrup. I use a thin blender spatula to make this easy, but a long spoon works, too. (The mixture stays thicker when you stir the yogurt in, rather than blend it in. This makes it most similar to the texture of a store bought yogurt pouch or tube.)
- Add mixture to reusable or disposable yogurt pouches or tubes. Store in the refrigerator or freezer until ready to serve.
Equipment
Notes
- Store prepared pouches in the refrigerator for up to 5 days or in the freezer for up to 6 months. From the freezer, you can either serve them frozen as popsicles (if you use a yogurt tube sleeve) or let thaw to normal yogurt tube consistency.
- Use mango, banana, or blueberry in place of the strawberry to vary the flavor.
- Use a small funnel to help make filling the yogurt tubes easier.
- Sweeten to taste. The amount of maple syrup you need will depend on the sweetness of your fruit and the preferences of your family.
- Greek yogurt makes for the thickest texture that is most similar to store-bought pouches. You can use regular yogurt too, though it may be a little runnier. (Both thicken slightly as they sit in the fridge though.)






So yummy!
Heads up, the link to reusable pouches is linking to a broccoli dish instead!
Ack, thank you, it’s fixed!